
It has always been a passion of mine to record, mix and master music. I am by no means a professional, but I tought I'd like to share my knowledge so far.
What is a producer you might ask. To be honest, i can't really tell. The term gets mixed up so much that the true meaning got lost to me. But in the end it doesn't really matter as much as you think, because what you do is what defines what you are doing, not what you call yourself.
I started fiddeling with sound engineering in my early teenage life. Our music teacher in 7th grade introduced us to a program called 'Studio One'. It's not well known and from my point of view not even the best, but so far it was sufficient for my purposes.
Purpose of the Art

My first thought often goes to the meaning and feeling I want to achieve. My main categories I consider are 'melanchonic', 'dark', 'uplifting', 'technical' and 'groovy'. These aren't definite answeres but I keep them like that in my head.
Intention aside, sometimes something bothers me in a song/sound and I know how to fix it. That's also the time I take out my Studio One and fix it.
I currently don't know much about music theory, but I know what chords exist and what patterns are often used, this is currently enough for me. If I had more knowledge in that area, I would maybe lay down a birds eye view on a piece of Art before I start working on it in more detail.
Equipment
To get a little closer to studio production quality, I acquired a couple of upgrades compared to a normal PC user.
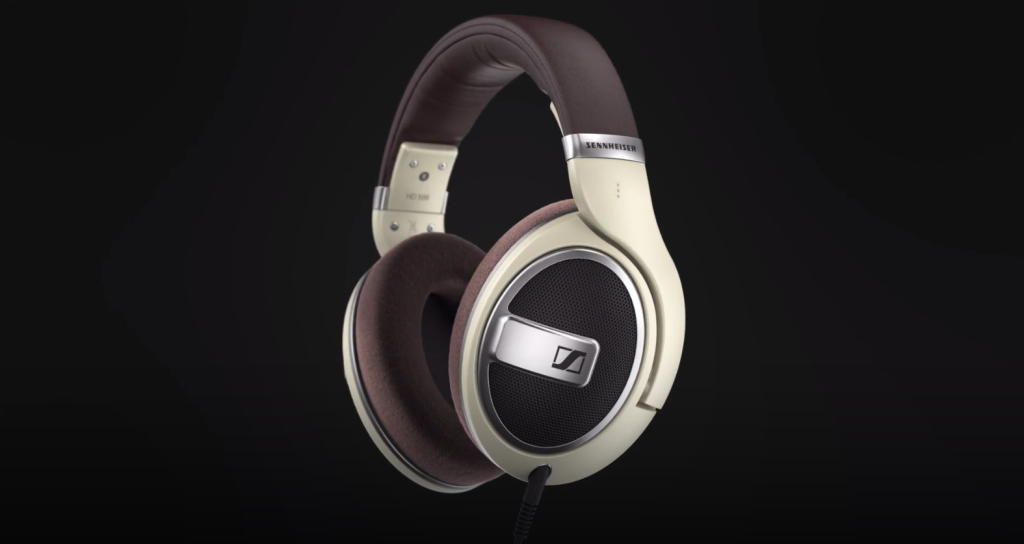
I am currently using Sennheiser HD 599 headphones, they are around $200 in price but have a couple of advantages, that I won't go into detail here.
Some people swear they cannot mix on headphones and need studio monitors, which are said to be as true to the 'correct' listening experience you can get. I myself have an old stereo sound system which i suspect must be at least 30 years old, which does the job aswell. On that note you have to remind yourself to test your songs on as many different devices as possible. If you know your stereo sound system is distoring your sound in a certain way there are also ways to adjust that.
Secondly I upgraded from my $20 microphone to the RØDE NT-USB. This option doesn't need any additional audio interface *which I later bought regardless* and serves as a good mid-tier microphone. With the right configuration you can leverage it to a production level microphone though.
In addition to that you don't need much else. I also bought the artist edition of Studio One, which costed me around $100. The offer keeps changing though as they seem to be changing business plans every two months.
Basics
If you first boot up a digital audio workstation you are greeted with a look like this
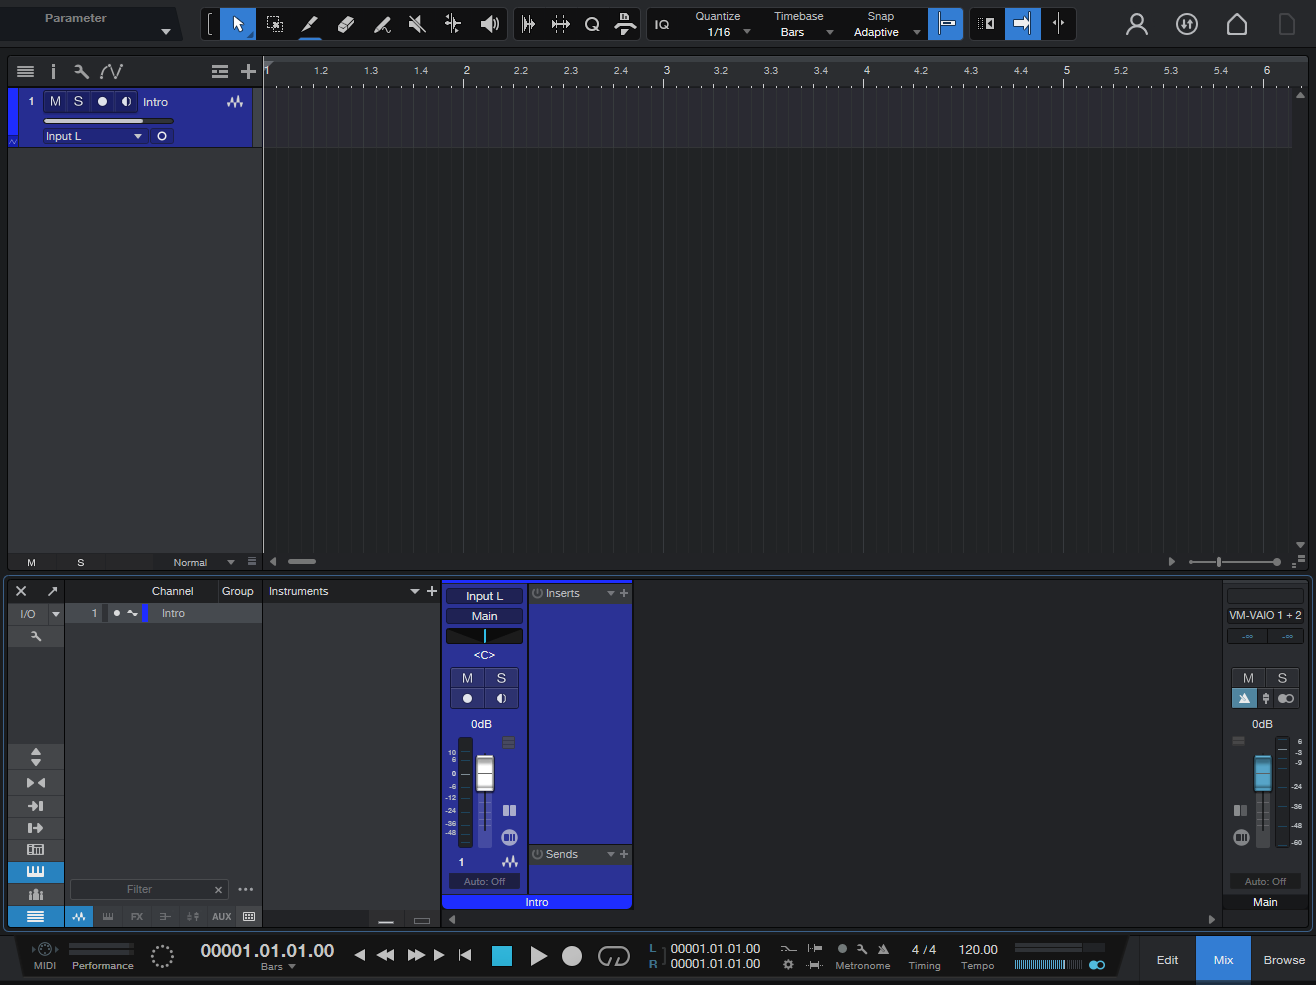
Whoever has used Audacity before would be a little overwhelmed by the additional options below, but in essence this isn't anything new.
The digital audio workstation tries to mimick a studio workplace with sliders for volume control and inserts into a channel, effects on them, and outputs (sends) to a number of other channels.
We have a number of tracks that are linked to channels and a bpm driven player that reads them and outputs them finally to our headphones.
Effects
As previously mentioned, channels have effects you can use. These are plug-in extensions that change the shape of the music.
Equalizer (EQ)
This is THE core component of sound design. It works in a subtractive manner, as it doesn't generate sound out of thin air. With an EQ you change the balance between low, mid and high frequencies. In modern days we have graphical EQs that give us a visual breakdown of which frequencies we are boosting and which we are supressing.
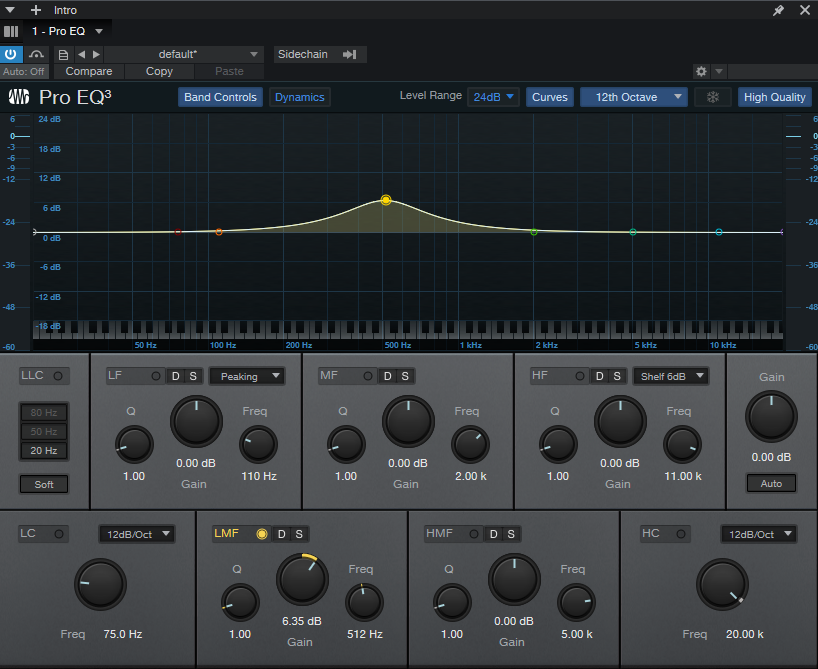
In the picture you can see a boost at 512 hz. This is the frequency that will be boosted by 6.35 dB. 6dB are a doublification in amplitude, but because our ears work in a log-like manner, we don't hear it twice as loud.
The normal human ear can hear roughly all sounds up to 20,000 hz. This is a rough estimate and the specific cutoff isn't that important because other factors like the output sound system change the sound much more significant.
A graphical EQ has a number of advantages - mainly being speed and surgical sound design. But for the vast majority of usecases the bottom of the picture, the knobs, is the place to look at. You don't need much in sound design besides your ears. You decide how a sound should sound like. I often see YouTube videos or comments that criticise some EQ effects for not giving them all the control they want, but I find that to be hilarious, because the level of control you get from the EQ displayed above is 10x the amount of control you got from mixing hardware in the 70s and 80s where many of the greatest songs of all time where created.
A little tip: I like to explore EQs and the feeling of specific frequencies. One way to do so is take a snare sample and boost/cut specific frequencies. Another way is to take a white noise sample and do the same.
Compressor
This is another crucial effect. The main purpose of the compressor was and is to regulate volume automatically over time. It has an input signal, determines an output volume and applies it to some other input signal to form an output signal. In the most simple case the two input signals being operated on are the same.
One use case for compressors is to make a song evenly loud over it's time. This means we boost low volume sections and turn down high volume sections. This is called reducing or compressing the dynamic range. On the opposite we can also use a compressor to expand the dynamic range. In this context we call that an expander.
A compressor is one of the effects that is easily explained, but hard to understand. It has a lot of parameters and the changes it makes are hard to hear and describe.
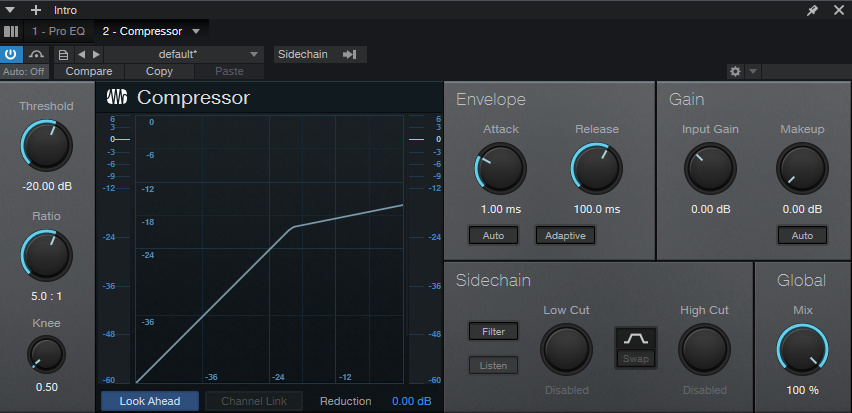
Let's first look at the visual representation. In this setup the input signal determines the output volume and applies it to the same input signal. So the line in the visual starts at the bottom-left corner and leads up to the top-right. For a while it does so with a 1:1 ratio. This means 1dB of gain in the input signal corresponds to 1dB of gain in the output signal. This is called a linear response. We dialed in a threshold value of -20dB up to which we want this linear behaviour to occur. If our input signal raises to -15 dB we observe the compression, as our output signal isn't at -15dB but at -19dB. This corresponds to a compression ratio of 5:1 as a gain of 5dB in the input signal raises the output signal by 1dB.
A quick side note about the dB scale in digital audio engineering. Often we see a value of -20dB. This means we have a 20dB headroom until the signal reaches it's maximum loudness, which can be represented by the underlying digital format. There are also other dB scales that take into account how our ear responds to longer lasting sounds or short sounds.
When the compressor determined an output volume it doesn't apply it immediately because distortion artefacts happen and because of stylistic choices can be made by fiddling with the attack delay. In the picture the attack delay is at 1ms. That is blazingly fast. Dialing in a longer attack delay yields a different kind of feel to a sound than immediate compression. The delay leaves room for the original peak transient to have an impact on our hearing, followed by a dip in the output volume created by that transient and delay. This particular arrangement lets our hearing believe the previous sound was much louder than it really was. To speak visually I constructed the following picture.
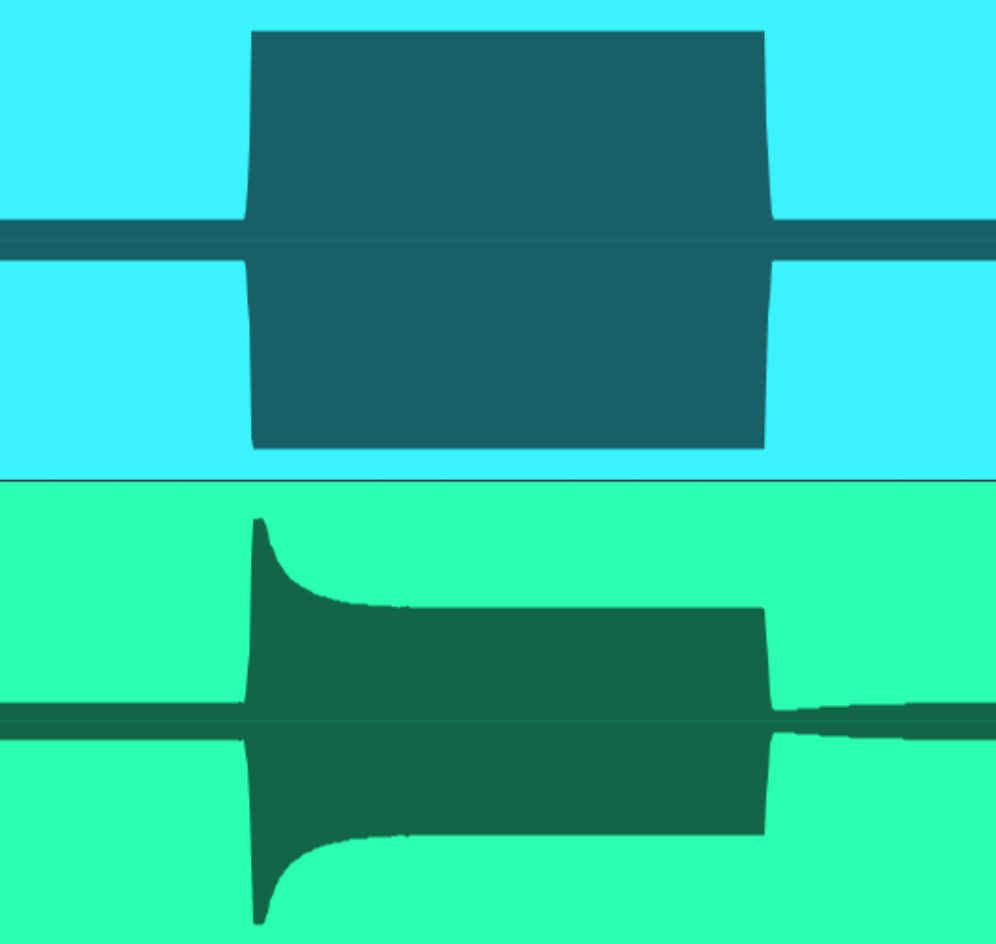
Here you can see the compressed output at the bottom in comparison with the input at the top. The outer signal at the top is at -20dB and thus doesn't experience compression. After the signal rises above the -20dB threshold, it doesn't immediately get compressed. Instead for 100ms the signal is at -0dB maximum amplitude. Only after 100ms have passed, the compression starts gradually. So in a sense compressors don't really calculate the output volume directly but rather build up a momentum in which they apply volume changes. This momentum or downwards compression force gets held over the whole time the input signal is at -0dB until it drops back down to -20dB. Then I dialed in a 200ms release delay. So for 200ms the downwards compression 'overshoots' and the output volume is at -34dB. Only after this release delay has passed the output volume slowly approaches it's desired -20dB.
With all that technicality out of the way we can finally return back to creating music.
What do I use compressors for? One answer would be to compress vocals. The human voice has a very high dynamic range and it's inherently hard for us to keep our volume consistent. Even when trying to shout out loud, higher tones often resonante better and are picked up louder. A compression ratio of 5 to 10 is very common here. Sections without loud background sounds leave more room for a voice with high dynamic range, because the quiter parts aren't swallowed up. Consider Skyfall by Adele. The song starts quietly with a piano and vocals. The vocals are most likely not compressed at this point, because their loudness falls below the compression threshold. As the song approaches the chorus the vocals need to be compressed more and more because the background keeps getting a little more epic and louder. Between 1:20 and 1:23, just before the first chorus starts, you can hear Adele get noticabely louder. Either she got closer to the microphone or in some way the gain got turned up for that track. But as a result she now hits the compression threshold.
The climax of the song is at 4:20 with noticable compression. This is necessary because the human voice changes it's characteristic when used loudly. This isn't the same as just turning up the volume.
Another good use case for compression are drums. Like discussed before, dialing in a slight attack and release delay shifts the compression and creates an undercompression when approaching the threshold from below and an overcompression when aproaching the threshold from above. These effects perfectly play together when compressing a drum. A normal drum sample starts with a big transient followed by a quick drop in volume. This means the signal first gets undercompressed and then overcompressed, making the transient seem louder and the rest of the sample seem quiter. This is also called 'punch' compression. You can also use the fact that compressors allow for two seperate inputs and one output. You can hook the drums input normally and apply the compression to a different track. This yields an output signal that gets compressed by 'thin air', only the compression being applied to it. This is called 'ducking' because the compression ducks-away the signal right when the drum kick or snare are hitting. This is useful for creating dynamic room for the drums. In a sense it acts like you could turn down all participants of a band at once except the drummer, making them loud in comparison.
One more thing that is really good to know for working with compressors. You have to make sure you don't compare apples to oranges. When applying compression you obviously reduce the dynamic range of the output, lowering its maximum loudness. Since you always want to keep your song as close to its maximum loudness you have to make-up that lost loudness by applying a 'make-up gain' to it after the compression. You really have to make sure that the average output volume matches the average input volume over the given comparison time frame, otherwise you will prefer the louder version most of the time just because our brains like loud music.
Work in progess...